Pool tile replacement is a critical aspect of pool maintenance that ensures both the structural integrity and aesthetic appeal of your swimming pool.
Whether you’re dealing with cracked tiles, loose installations, or simply updating your pool’s appearance, understanding the proper techniques for pool tile replacement can save you significant costs while maintaining your pool’s value.
Pool tiles endure constant exposure to water, chemicals, temperature fluctuations, and physical stress, making them susceptible to various forms of damage over time.
For residents of the DFW metroplex, Tropix Pools provides expert pool tile repair services, combining the craftsmanship of experienced pool builders with comprehensive pool maintenance expertise.
When Do Pool Tiles Need to Be Replaced?
Determining when pool tiles require replacement involves assessing both visible damage and underlying structural issues that may compromise pool integrity.
Several key indicators signal the need for tile replacement, ranging from obvious physical damage to subtle signs of adhesive failure.
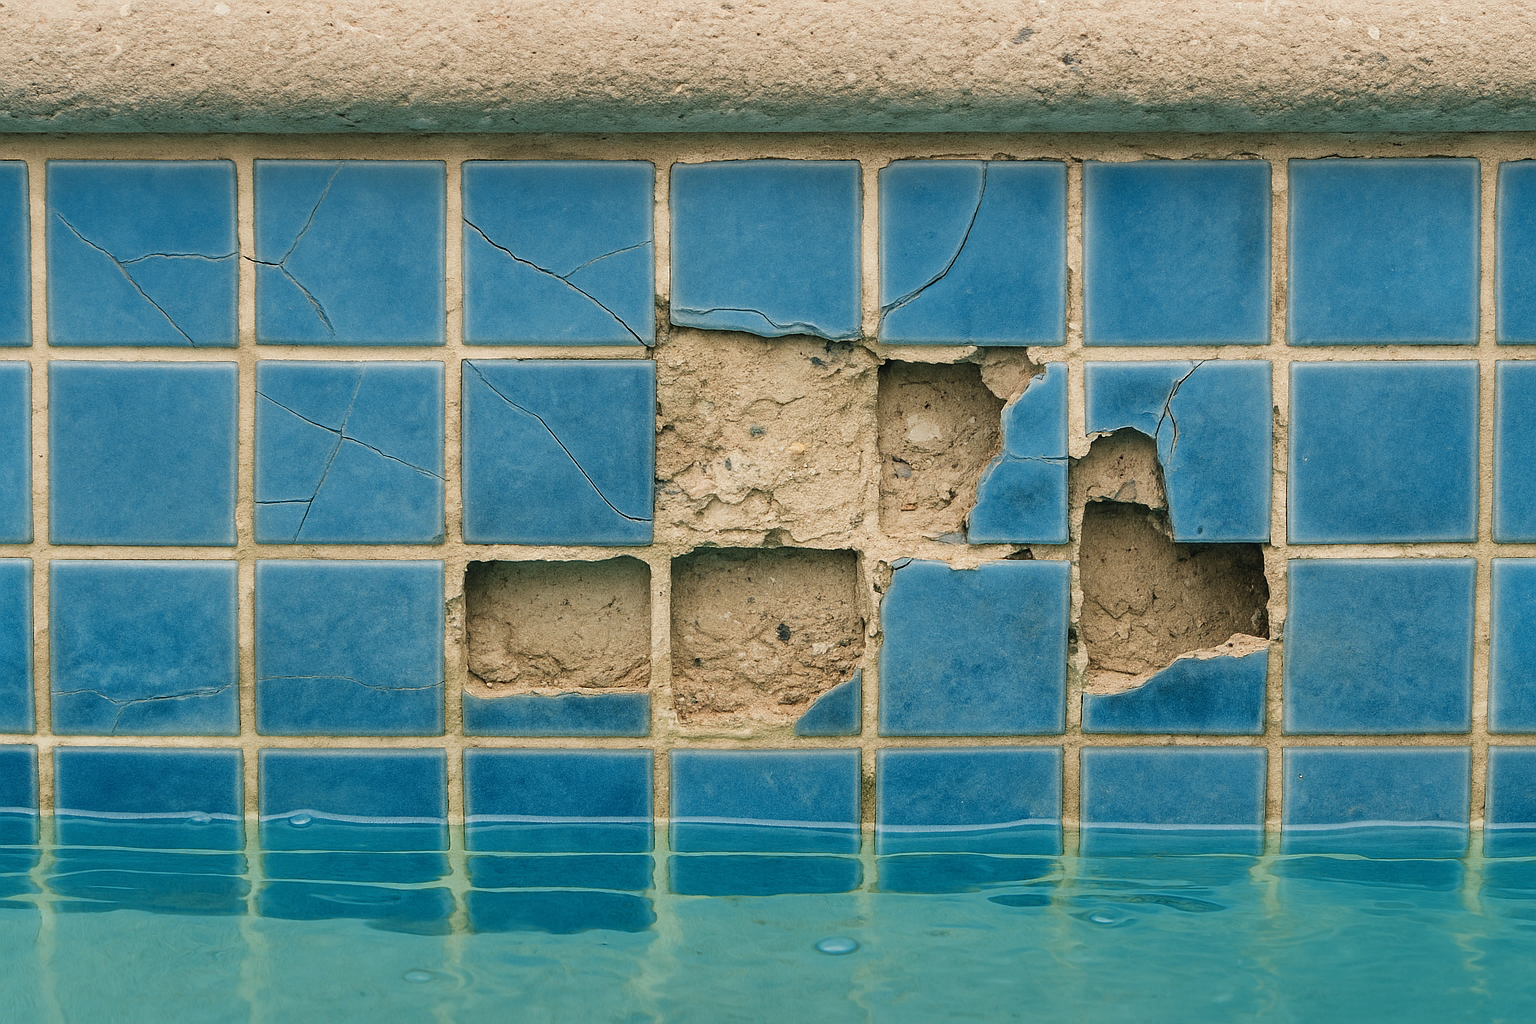
Cracked tiles represent the most obvious sign that replacement is necessary.
Pool Cracks can occur due to ground settling, temperature fluctuations, impact damage, or natural aging of tile materials.
Even small cracks can allow water to penetrate behind tiles, potentially causing more extensive damage to pool structure and surrounding tiles.
Loose or missing tiles indicate adhesive failure or substrate problems that require prompt replacement.
Tiles that sound hollow when tapped, move when pressed, or have obviously separated from the pool surface pose safety risks and allow water infiltration.
Missing tiles create immediate hazards and expose pool surfaces to damage from chemicals and environmental factors.
Discoloration that cannot be removed through professional pool cleaning may indicate tile degradation or chemical damage.
Age-related wear becomes apparent in pools over fifteen years old, where tiles may show cumulative effects of chemical exposure and general wear.
What Tools and Materials Are Needed for Pool Tile Replacement?
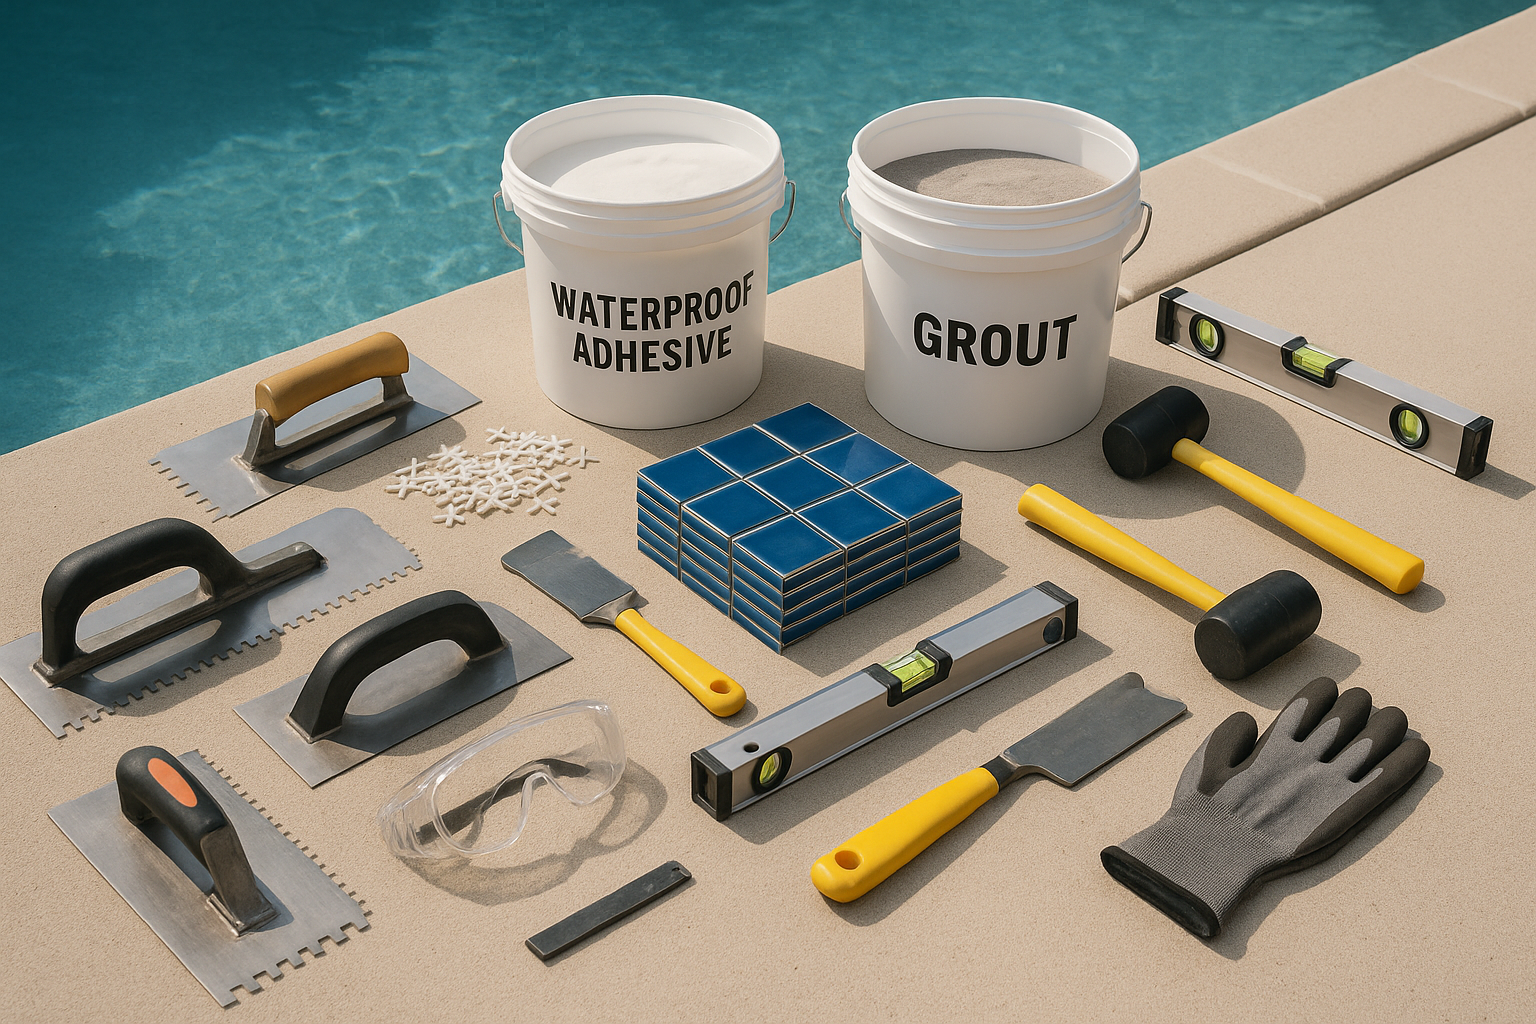
Successful pool tile replacement requires specific tools and materials designed for underwater and wet environment applications.
Proper preparation and having the right equipment ensures professional-quality results and prevents common installation problems.
Essential tools for tile removal include hammer and chisel sets for breaking adhesive bonds, grout removal tools for cleaning grout lines, scrapers for removing old adhesive, and safety equipment including eye protection and gloves.
Power tools such as oscillating multi-tools with grout removal attachments can significantly speed the removal process.
Installation tools encompass trowels for adhesive application, tile spacers for consistent gaps, rubber mallets for setting tiles, levels for ensuring proper alignment, and sponges for cleaning excess adhesive and grout.
A tile wet saw may be necessary for cutting tiles to fit specific spaces.
Material selection begins with replacement tiles that match existing installations in size, color, and material properties.
Adhesive selection is critical for pool applications, requiring waterproof formulations designed for constant water exposure.
Thinset mortar specifically formulated for swimming pools provides excellent adhesion and water resistance.
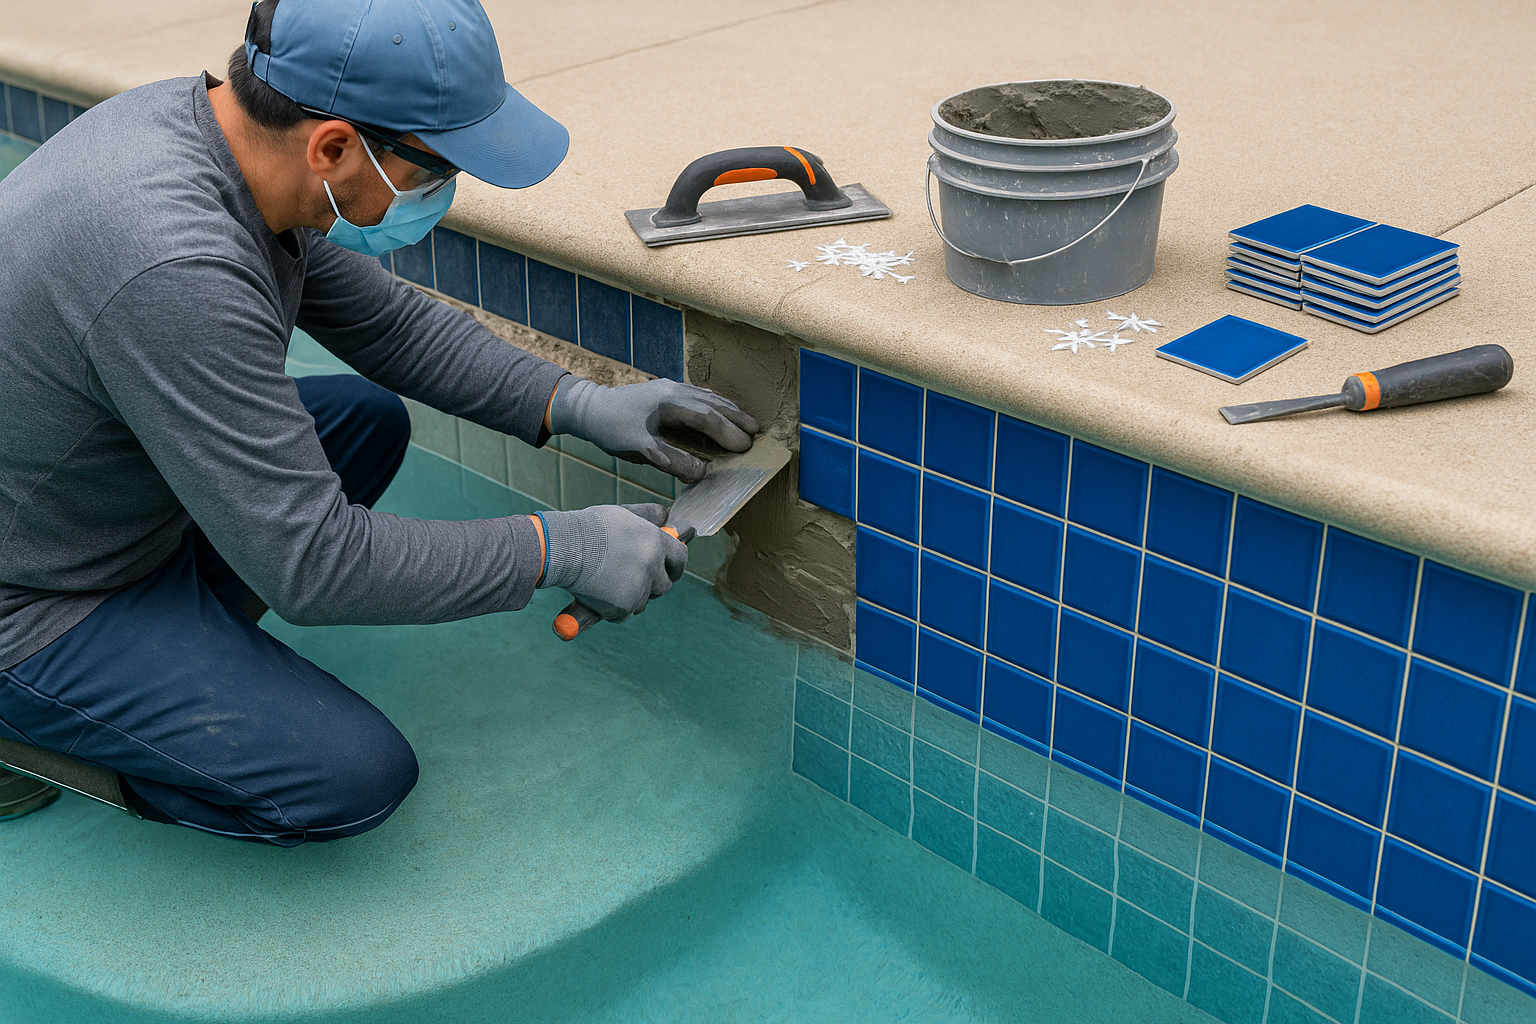
How Do You Remove Damaged Pool Tiles?
Proper tile removal techniques preserve surrounding tiles and pool structure while preparing surfaces for new installations.
Begin tile removal by lowering pool water below the work area to provide better access and prevent water interference with adhesive removal.
Start removal by addressing grout lines around damaged tiles.
Use grout removal tools to carefully extract grout material, working slowly to avoid damaging adjacent tiles.
Remove all grout material to expose tile edges and adhesive bonds.
Break adhesive bonds by carefully chiseling behind tiles, starting at corners or edges where access is easiest.
Work gradually to avoid sudden tile breakage that could damage surrounding installations.
For stubborn adhesive bonds, apply gentle heat with a hair dryer to soften adhesive materials.
Clean removal areas thoroughly by scraping away old adhesive and debris to create smooth, clean surfaces for new installations.
Inspect substrate surfaces for damage that may require pool renovation services before installing new tiles.
What Type of Adhesive Should You Use for Pool Tiles?
Selecting appropriate adhesive for pool tile installation is crucial for long-term performance and durability in the challenging pool environment.
Pool tiles must withstand constant water exposure, chemical contact, temperature fluctuations, and mechanical stress, requiring specialized adhesive formulations.
Thinset mortar designed specifically for swimming pool applications represents the most common and reliable choice for pool tile installation.
These formulations include waterproofing additives and chemical-resistant properties that standard thinset mortars lack.
Epoxy-based adhesives offer superior performance for demanding applications such as underwater installations or areas subject to extreme conditions.
These adhesives provide excellent chemical resistance, waterproofing properties, and mechanical strength.
Consider tile material compatibility when selecting adhesives, as different tile types may require specific adhesive formulations.
Natural stone tiles often require non-staining adhesives, while glass tiles may need specialized adhesives for optimal bonding.
How Do You Install New Pool Tiles Properly?
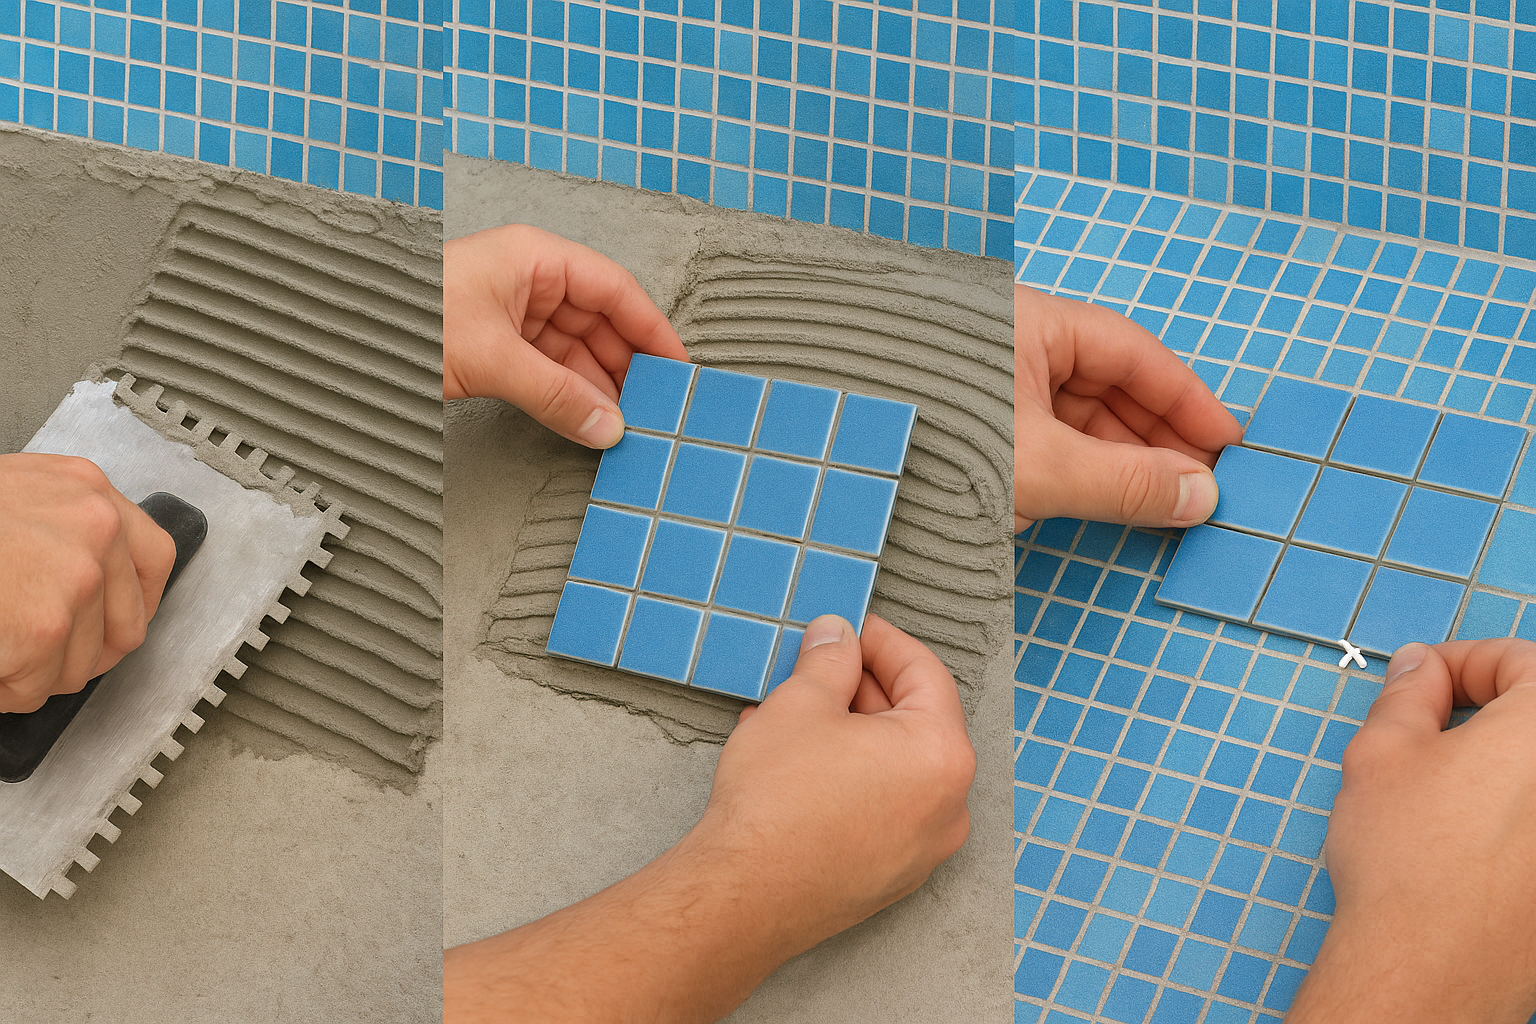
Proper tile installation techniques ensure long-lasting, attractive results that withstand the demanding pool environment.
Surface preparation forms the foundation of successful tile installation.
Clean all surfaces thoroughly to remove debris, old adhesive residue, and any contaminants that could interfere with adhesion.
Plan tile layout carefully to ensure attractive, symmetrical installations that accommodate pool features and maintain consistent spacing.
Use chalk lines or temporary guides to establish reference points for tile placement.
Mix adhesive according to manufacturer instructions, preparing only the amount that can be used within the specified working time.
Apply adhesive evenly using appropriate trowel sizes to achieve consistent coverage and proper thickness.
Set tiles systematically, starting from established reference points and working outward in logical sequences.
Press tiles firmly into adhesive, using slight twisting motions to ensure complete contact. Use tile spacers to maintain consistent gaps for grout lines.
Check alignment frequently using levels and straightedges to ensure flat, even surfaces.
Allow proper cure time before proceeding with grouting or exposing installations to water, following adhesive manufacturer recommendations.
When Should You Hire Professional Pool Tile Installers?
While some pool tile replacement projects can be handled by experienced DIY enthusiasts, many situations warrant professional installation to ensure optimal results and prevent costly mistakes.
Complex installations involving intricate patterns, multiple tile types, or challenging geometries benefit from professional expertise.
Structural repairs that accompany tile replacement often require professional assessment and remediation.
Issues such as substrate damage, waterproofing problems, or pool shell repairs exceed typical DIY capabilities and may affect pool safety and integrity.
Valuable or delicate tile materials such as natural stone, custom ceramics, or glass tiles require specialized handling and installation techniques.
Professional installers understand the unique requirements of different tile materials and have experience preventing damage during installation.
For homeowners in the DFW metroplex, Tropix Pools offers comprehensive pool tile repair and replacement services backed by years of experience and local expertise.
Their team understands regional conditions, water chemistry factors, and installation challenges specific to Texas pools.
How Much Does Pool Tile Replacement Cost?
Pool tile replacement costs vary significantly based on factors such as tile material, installation complexity, project scope, and regional labor rates.
Material costs depend primarily on tile selection, with basic ceramic tiles starting around $2−$5 per square foot, while premium material such as natural stone or glass can cost $15-$50 per square foot or more.
Labor costs for professional installation typically range from $5-15 per square foot, depending on installation complexity and regional rates.
Simple waterline tile replacement costs less than complex pattern installations or projects requiring extensive substrate preparation.
Project scope affects total costs through economies of scale and setup requirements.
Small repair projects may have higher per-square-foot costs due to minimum charges, while larger projects benefit from reduced per-unit costs.
Additional costs may include pool draining and refilling, temporary equipment rental, disposal of old materials, and related repairs discovered during tile removal. Consider all factors when comparing DIY versus professional installation options.
How Do You Maintain New Pool Tiles?
Proper maintenance of newly installed pool tiles ensures long-term performance and appearance while protecting your investment in pool tile repair and replacement.
Initial curing protection is critical for new tile installations. Avoid exposing new installations to pool chemicals or mechanical stress during the cure period.
Water chemistry management becomes even more important with new tile installations.
Maintain proper pH, alkalinity, and sanitizer levels to prevent chemical damage to new grout and adhesive materials.
Regular cleaning prevents buildup that can damage new installations or create permanent staining.
Monitor installations for signs of problems such as loose tiles, grout deterioration, or water infiltration.
Early detection and correction of minor problems prevents major issues that could require extensive repairs.
Professional pool maintenance services can provide expert monitoring and preventive care.
Conclusion
Pool tile replacement represents a significant investment in your pool’s appearance, functionality, and structural integrity.
Understanding when replacement is necessary, proper installation techniques, and ongoing maintenance requirements ensures optimal results and long-term satisfaction.
Whether you choose DIY installation or professional services, success depends on careful planning, quality materials, proper techniques, and attention to detail.